<< Download all the exercises here >>
What could a drummer possibly have to teach a piano player? I mean, it’s not like they’re musicians!
KIDDING!
In all seriousness, I have always been amazed at how quickly drummers can master hand independence on the piano. It’s one of the most difficult things for beginners to figure out, but if a new learner has played drums before it’s almost never a problem.
It’s like they understand rhythm or something 🙂
My rhythm is actually pretty terrible. I’ve mentioned in the past about how I struggle reading music, and this also translates to reading and counting rhythm. I much prefer to play by ear. If I can HEAR a rhythm I’m much more likely to get it.
And that just means I have some things to work on. But because I’m so bad at rhythm I needed to get someone else to help me out.
If you haven’t heard about Drumeo they are the biggest online drum educator in the world (and our neighbor – we share studios). Dave Atkinson is the rhythm guru, and he’s also a piano player!
And he has 4 exercises for us to practice which will challenge us — but will also help improve our hand independence and rhythm. Now if you’re like me and find it easier to listen to the rhythm first, make sure you watch the lesson. But I’ll put all 4 exercises below. You can also download them here.
The chord progression Dave chose is a very common one (it’s used in “The Scientist” by Coldplay), but the progression is not what’s important. You can choose any progression you like. It doesn’t even have to be a progression – you could just play single notes.
Dave calls this one the “single stroke roll” (he’s such a drummer). For the most part, your hands will be playing at DIFFERENT times (hence the roll). Only at the start of each measure will they be played together:
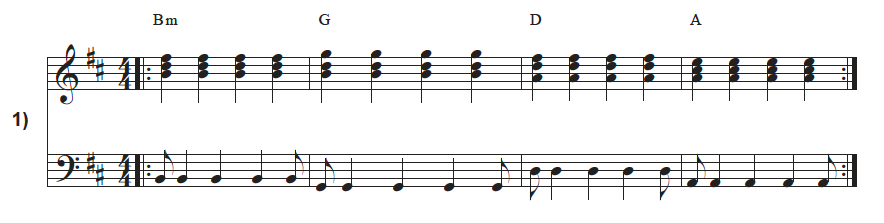
Your right hand will just play quarter notes (or chords). That won’t change, and I find it helpful to remember that because it allows me to focus on the left hand.
As Dave points out in the lesson, it might help to tap these rhythms out on the top of the piano before playing them on the keys. Remember, it’s the rhythm and independence that are important here. Not the notes themselves.
If you do like to count, it’s helpful to count in eighth notes. So each measure will be 1 – & – 2 – & – 3 – & – 4 – &. The 1,2,3,4 are the quarter-note beats, and the “&s” are the eighth-note beats in between.
Apart from the very first beat of the measure — every left-hand note is played on an “&” beat.
This is an expansion of Exercise # 1, and it helps to know that the right-hand stays exactly the same. There is no change. There is only a slight change to the left-hand rhythm in the middle of each measure. But the start and end of each bar are still the same:
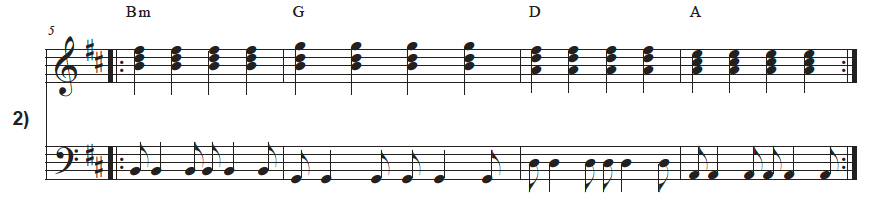
Again, it might help to count out these bars in eighth-note values to figure out where the beats will land. And I definitely recommend tapping out every rhythm on the top of the piano before playing it on the keys.
Now we are getting a little fancier by adding dotted-note values. But again the right-hand doesn’t change, and we’re actually playing FEWER notes in the left-hand than before:
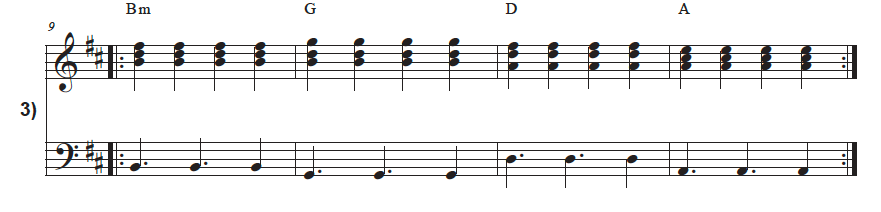
A dotted-quarter note means that we play and hold the note for 1.5X its normal length. So for a quarter note that means we play the value of a quarter note PLUS a half note.
This exercise is great because you can build up quite a bit of speed once you get the rhythm going. And once you get this one, you’re ready for the final exercise.
This one is similar in rhythm to Exercise # 3, but now we are swapping the hands. So your left-hand will be playing on every quarter note beat, and your right-hand will be doing the fancy rhythm. You might actually find this easier than the others because most people have a better right hand.
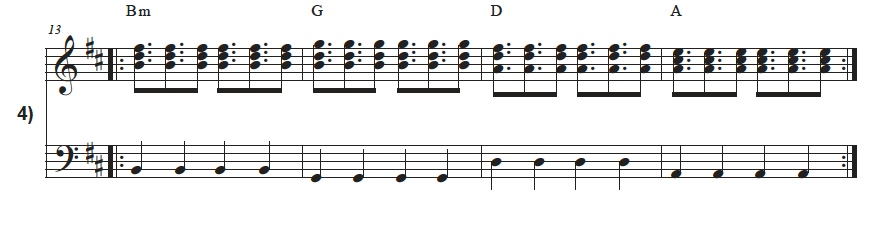
As you can see there are dotted eighth notes now. So if a dotted note means the note is 1.5X its normal length, then a dotted eighth note is the value of an eighth-note PLUS a sixteenth-note.
At the start of the lesson, I showed you how to count out a measure in eighth-note values. Well, you can also count it out in sixteenth-note values. It looks like this:
| 1 – e – & – a – 2 – e – & – a – 3 – e – & – a – 4 – e – & – a |
You can see we still have the 4 quarter-note beats (1,2,3,4). The “&” represents the eighth-note beats, and we have added the “e” and “a” beats in between to represent the sixteenth-note beats.
It’s definitely a lot easier to show than tell, so make sure you watch the entire lesson. And for more on counting rhythms, Cassi has a great lesson here.
As Dave says in the lesson, these are simple drum rhythms that drummers learn very early. They are NOT simple rhythms for pianists. You’ll see how I struggle to get them initially.
Don’t feel bad if they are difficult for you. So often I see comments from people who try an exercise and can’t do it, and then feel like a failure.
These are exercises for you to practice and get better at, NOT to master on the first try. If you could already do this, then there would be no point showing you!
So take it slow, count it out, tap it out on the piano, and as always…
Have fun!
Lisa Witt has been teaching piano for more than 20 years and in that time has helped hundreds of students learn to play the songs they love. Lisa received classical piano training through the Royal Conservatory of Music, but she has since embraced popular music and playing by ear in order to accompany herself and others. Learn more about Lisa.
/marketing/pianote/promos/april/banner-bg-m.webp)
/marketing/pianote/promos/april/trial-banner.png)
/marketing/pianote/promos/april/banner-title.webp)