Do you know that beginners can instantly sound better on the piano with a few simple—yet beautiful!—piano chord patterns? In this lesson, we’ll walk you through some simple yet sophisticated piano chord patterns step-by-step.
The first part is a play-along with Lisa. The second part is a new video we’ve released with even more chord patterns you can try—inspired by popular music you’ll likely recognize!
Table of Contents:
Inspiring tutorials. Fascinating articles. Exclusive interviews. We create piano content anyone, anywhere can enjoy for free. Don’t miss out, sign up for more free lessons.
In this beginner play-along lesson, we’ll show you two chord sets and different patterns to play them each. These chords are in F major and are based on the I-V-vi-IV pop progression.
To create a beautiful, delicate sound, we’ll play in a higher octave. You may want to scooch to the right side of your bench so you don’t have to wiggle to reach for notes. Here is our first set of chords and their fingering:

We’ll play the chords in the following order: F-C-Dm-Bb. This is a I-V-vi-IV progression. You’ll notice that not all chords are in root position triads—that’s because we’ll be playing these chords in inversions, meaning we’ve shuffled the order of notes in each triad. This changes the sound somewhat and also makes it easier to transition between chords.
Practice moving through these chords in their solid form until you’re comfortable with the shapes. Practice with one hand, and then the other.
Onto our first pretty chord pattern! We’ll do the work on our right hand first, so play the chord progression broken twice like this:
F Major: Root Position
F-A-C-A, F-A-C-A
Right hand: 1-3-5-3, 1-3-5-3
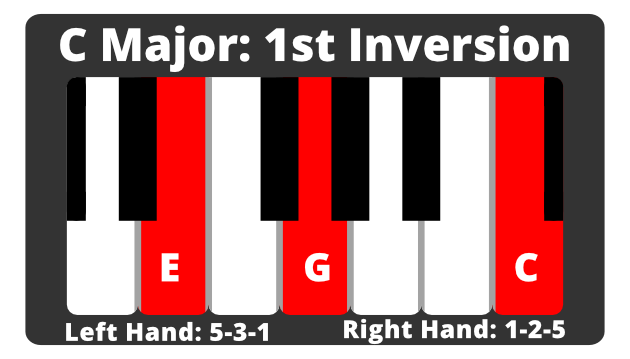
C Major: 1st Inversion
E-G-C-G, E-G-C-G
Right hand: 1-2-5-2, 1-2-5-2
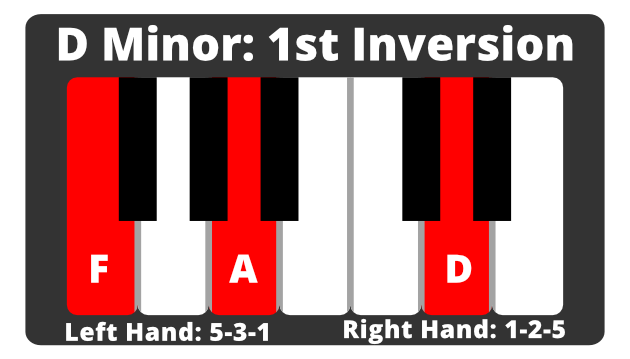
D Minor: 1st Inversion
F-A-D-A, F-A-D-A
Right hand: 1-2-5-2, 1-2-5-2
B Flat Major: 2nd Inversion
F-Bb-D-Bb, F-Bb-D-Bb
Right hand: 1-3-5-3, 1-3-5-3
Play along with me and repeat the pattern a few times. Get very comfortable with it.
When you’re ready, pair your right hand with the root notes on your left hand. The root note progression is:
F – C – D – Bb
If you want, you can press down the sustain pedal for an even prettier, floatier feel. Before long, you’ll be sounding like a music box!
Now let’s add a little more to our patterns. We’ll linger a little longer on the middle and top notes of these chords. So, practice setting up your hand on top of the next chord’s notes.
F Major: Root Position
F-A-C-A-C-A-C-A
Right hand: 1-3-5-3-5-3-5-3
Left hand: 5-3-1-3-1-3-1-3
C Major: 1st Inversion
E-G-C-G-C-G-C-G
Right hand: 1-2-5-2-5-2-5-2
Left hand: 5-3-1-3-1-3-1-3
D Minor: 1st Inversion
F-A-D-A-D-A-D-A
Right hand: 1-2-5-2-5-2-5-2
Left hand: 5-3-1-3-1-3-1-3
B Flat Major: 2nd Inversion
F-Bb-D-Bb-D-Bb-D-Bb
Right hand: 1-3-5-3-5-3-5-3
Left hand: 5-2-1-2-1-2-1-2
Once your right hand is familiar with the chords, add the root notes in your left hand for some accompaniment. Remember to relax your arm and shoulders if you start to feel some wrist fatigue.
Then, mirror the pattern by playing the broken pattern on your left hand and the root notes in your right hand.
Pay attention to how your left hand feels in comparison to your right. I definitely hold more tension in my left hand. So, if you’re right-handed, spend a little extra time getting your left hand comfortable.
Once you’ve mastered this, see if you can speed it up!
Now let’s go one step further and add even more to these broken chord patterns! This time, we’ll go bottom > middle > top > middle > top > middle > bottom > middle.
Written out, the notes and fingering look like this:
F major: root position
F-A-C-A-C-A-F-A
Right hand: 1-3-5-3-5-3-1-3
Left hand: 5-3-1-3-1-3-5-3
C major: 1st inversion
E-G-C-G-C-G-E-G
Right hand: 1-2-5-2-5-2-1-2
Left hand: 5-3-1-3-1-3-5-3
D minor: 1st inversion
F-A-D-A-D-A-F-A
Right hand: 1-2-5-2-5-2-1-2
Left hand: 5-3-1-3-1-3-5-3
Bb major: 2nd inversion
F-Bb-D-Bb-D-Bb-F-Bb
Right hand: 1-3-5-3-5-3-1-3
Left hand: 5-2-1-2-1-2-5-2
This makes a lot more sense when you hear it, so feel welcome to rewind the video a few times to get used to the sound.
Practice the broken chords in one hand with the root notes in the other, then switch it up. Mimic the fingering I’m using here (such as using left finger 2 on Bb) for the most efficient way to play.
Sometimes people ask whether it’s okay to look at your hands—the answer is YES! Do you what you need to play what you like 🙂
These are essentially the same chords as Set #1, but in different inversions.

The transition and fingering change between F major and C major can be tricky, so practice moving between these two chords. You’ll get it in no time!
Now let’s practice the first broken chord pattern with these inversions. Pair the following patterns with the root note in your left hand.
When you’re done, switch it up so you’re playing broken chords on your left hand and the root note in your right.
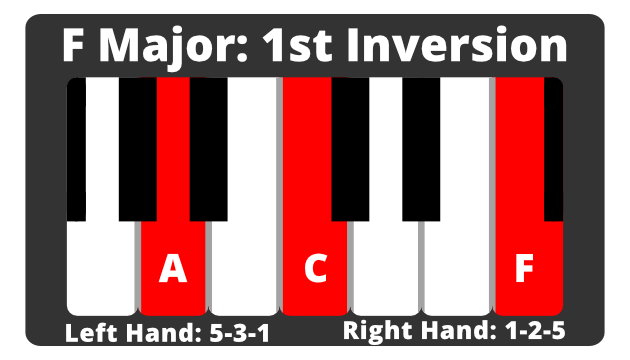
F major: 1st inversion
A-C-F-C, A-C-F-C
Right hand: 1-2-5-2, 1-2-5-2
Left hand: 5-3-1-3, 5-3-1-3
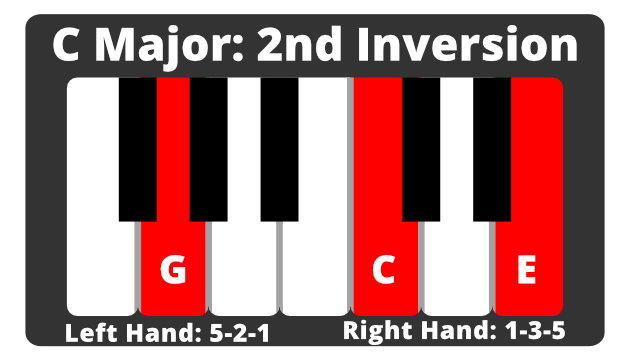
C major: 2nd inversion
G-C-E-C, G-C-E-C
Right hand: 1-3-5-3, 1-3-5-3
Left hand: 5-2-1-2, 5-2-1-2
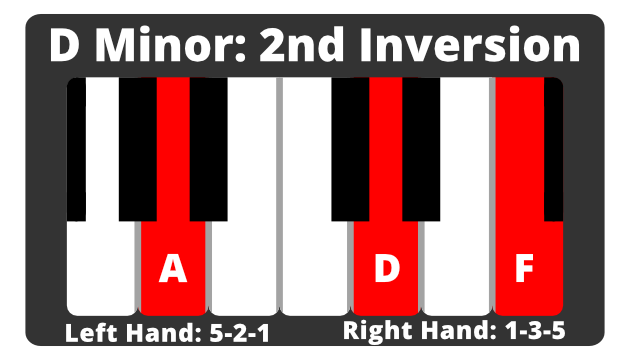
D minor: 2nd inversion
A-D-F-D, A-D-F-D
Right hand: 1-3-5-3, 1-3-5-3
Left hand: 5-2-1-2, 5-2-1-2
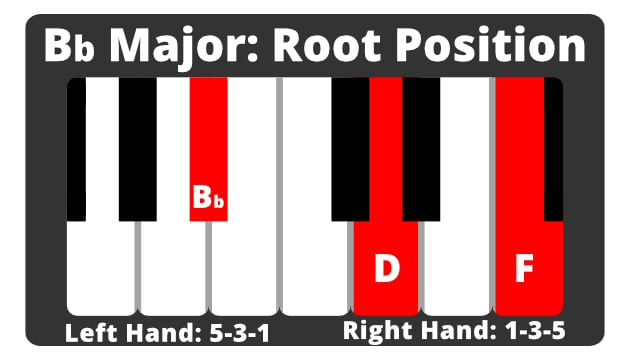
Bb major: root position
Bb-D-F-D, Bb-D-F-D
Right hand: 1-3-5-3, 1-3-5-3
Left hand: 5-3-1-3, 5-3-1-3
By the way: if you mix up your inversions on occasion, that’s okay! Just reset your hands and start again.
Eventually, we hope you’ll add your own creative touch to these patterns. Improvise, experiment, and make these patterns your own!
Just like the previous set, let’s build out our chords. Written out, the second pattern looks like this:
F major: 1st inversion
A-C-F-C-F-C-F-C
Right hand: 1-2-5-2-5-2-5-2
Left hand: 5-3-1-3-1-3-1-3
C major: 2nd inversion
G-C-E-C-E-C-E-C
Right hand: 1-3-5-3-5-3-5-3
Left hand: 5-2-1-2-1-2-1-2
D minor: 2nd inversion
A-D-F-D-F-D-F-D
Right hand: 1-3-5-3-5-3-5-3
Left hand: 5-2-1-2-1-2-1-2
Bb major: root position
Bb-D-F-D-F-D-F-D
Right hand: 1-3-5-3-5-3-5-3
Left hand: 5-3-1-3-1-3-1-3
Once you’ve mastered this one, go to our third and final pattern!
The third pattern of the second set looks like this:
F major: 1st inversion
A-C-F-C-F-C-A-C
Right hand: 1-2-5-2-5-2-1-2
Left hand: 5-3-1-3-1-3-5-3
C major: 2nd inversion
G-C-E-C-E-C-G-C
Right hand: 1-3-5-3-5-3-1-3
Left hand: 5-2-1-2-1-2-5-2
D minor: 2nd inversion
A-D-F-D-F-D-A-D
Right hand: 1-3-5-3-5-3-1-3
Left hand: 5-2-1-2-1-2-5-2
Bb major: root position
Bb-D-F-D-F-D-Bb-D
Right hand: 1-3-5-3-5-3-1-3
Left hand: 5-3-1-3-1-3-5-3
Once again, pair the broken chords on one hand with the root notes on the other hand. When you’re more comfortable, ramp up your speed!
If you make a mistake, just keep going. Mistakes are not the end of the world, and it happens to the best of us. In fact, knowing how to keep moving after a mistake is a great skill to learn.
In this lesson, we’ll introduce you to some beautiful piano chord patterns that you may recognize from pop songs! Some of the patterns are the same as the ones we did in Part 1, but we’ll be venturing into different keys and progressions and applying our patterns to pop songs.
Go to our Members’ Area for sheet music downloads. If you’re not a member yet, try Pianote for free!
For this pattern, we’ll be venturing into the melancholic key of C minor and playing this i-iv-III-VII progression:
Cm – Fm – Eb – Bb
We’ll play Cm in 2nd inversion, Fm in 1st inversion, and Eb in 2nd inversion. And we’ll play the top two notes separate from the bottom. So, in standard notation, it’ll look like this:
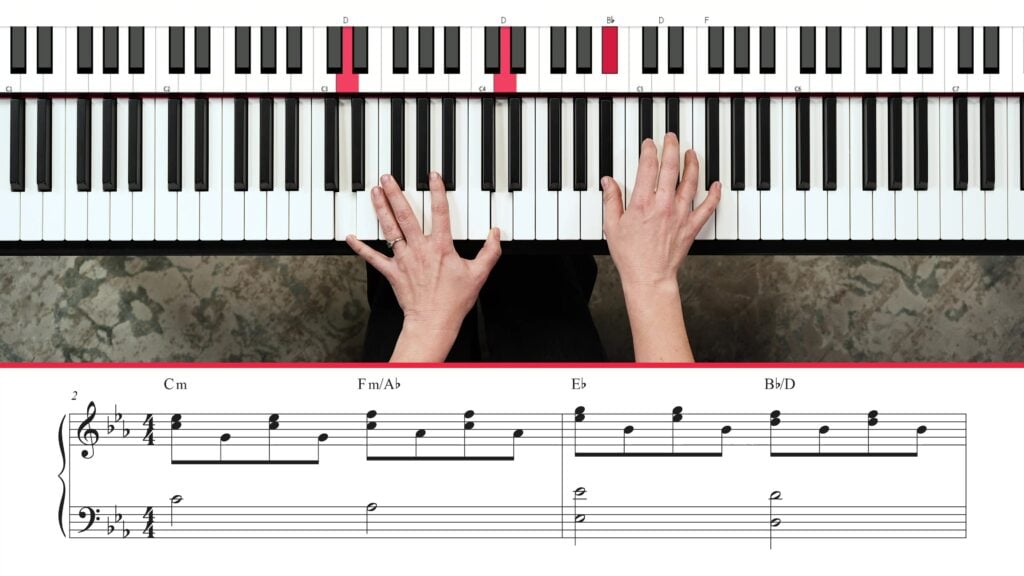
This pattern works no matter what inversion your chords are in! If you play the top two notes together followed by the bottom note, you’ll sound good 🙂
If C minor feels tricky, you can try the same progression transposed to A minor: Am – C – G – F.
Psst: Try singing “Apologize” (Timbaland feat. One Republic) on top of this progression.
This riff is iconic. It’s a series of quick sixteenth notes arranged in an A major I-iii-vi-IV progression:
A – C#m/G# – F#m – D
And the pattern I’ll play goes like this: bottom-middle-top-middle.
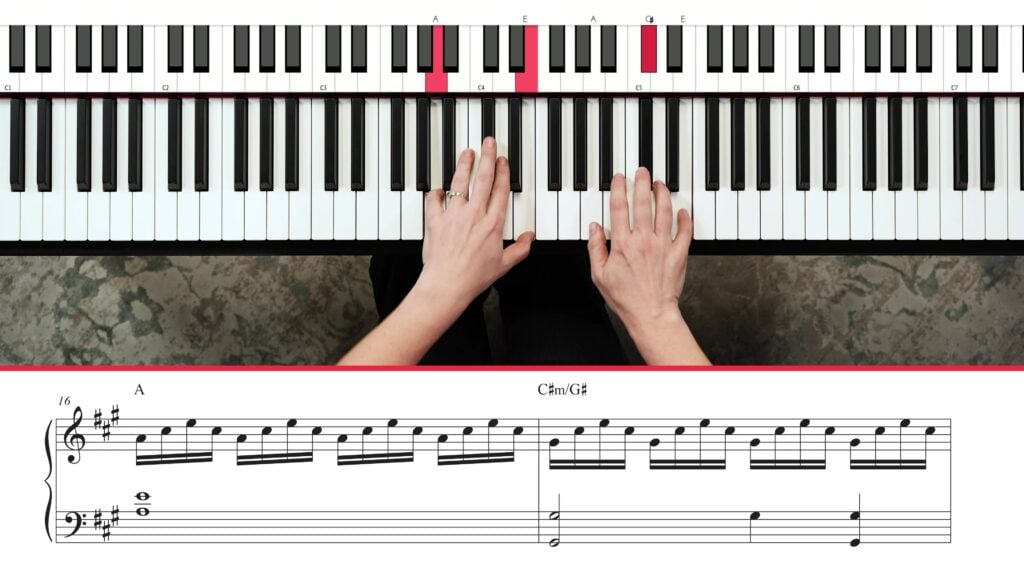
In my video example, I play A in root position, C#m in 2nd inversion, F#m as a power chord (root-fifth-root), and D in 2nd inversion.
The sixteenth note pattern is what’s used in “Someone Like You,” but you can play it slower and more dramatically. Try this in both major and minor keys!
> How to Play “Someone Like You”
This pattern is also known as the Alberti bass. It has a very long history and Mozart loved using it. We’re calling it the “Amélie” because it’s a key feature of the movie’s main theme. Here’s the chord progression we’ll use:
Am – C – G – Am
And here’s the pattern: bottom-top-middle-top.

The tempo of the Amélie theme is rather fast, but you can definitely play this pattern at a slower pace. Psst: try singing “The Sound of Silence” (Simon and Garfunkel) over this!
Again, the same logic as before works: you can play any chord shape you want. Just follow the same bottom-top-middle-top pattern.
Broken chords on the piano (or piano arpeggios if you want to sound fancy!) are both very useful chord patterns and a way to practice technique and hand independence. So try these patterns with different chords, progressions, keys, moods, and more! And if you want to improvise over your progressions like I do at the end of the second video, we have lessons for that too.
Want more help with chords? Check out these free resources:
Lisa Witt has been teaching piano for more than 20 years and in that time has helped hundreds of students learn to play the songs they love. Lisa received classical piano training through the Royal Conservatory of Music, but she has since embraced popular music and playing by ear in order to accompany herself and others. Learn more about Lisa.
/marketing/pianote/lead-gen/getting-started/coach.webp)
By signing up you’ll also receive our ongoing free lessons and special offers. Don’t worry, we value your privacy and you can unsubscribe at any time.
/marketing/pianote/lead-gen/chords-progressions-digital-book/chord-progressions-exit.webp)
Want to play the most popular songs on piano?
Grab the Little Book of Chord Progressions to learn the most popular chord progressions used in modern music.
No credit card. No spam.
Just awesome chords to get you playing.
Don’t worry, we value your privacy and you can unsubscribe at any time.
/marketing/drumeo/promos/july/Primary.svg)
/marketing/pianote/promos/april/trial-banner.png)