Are you ready to boogie? In this lesson, get ready to rock the boogie-woogie with Kevin Castro.
Before you begin, be sure to download the lesson resources. Pianote Members can also play along to a backing track. If you’re not a Member yet, no worries! You can access the backing tracks for seven days with a free trial.
The 12 bar blues forms the foundation of this boogie woogie lesson. So make sure you practice this part well and get it down pat. The more you master the foundations, the more fun you’ll have with the fancy stuff. Better yet, memorize the chord changes in the 12 bar blues.
Here are our 12 bars:
| G | G | G | G |
| C | C | G | G |
| D | C | G | G |
Next, practice the left hand walking bass line. These are built on the G6, C6, and D6 chords. All that means is adding a sixth to each chord. You can think of it as playing a regular triad with the next note added. Here’s the suggested fingering:

The right hand part of the boogie-woogie rocks between the main chord and notes just above it. Try this fingering. Pay attention to C7—there’s a flat.
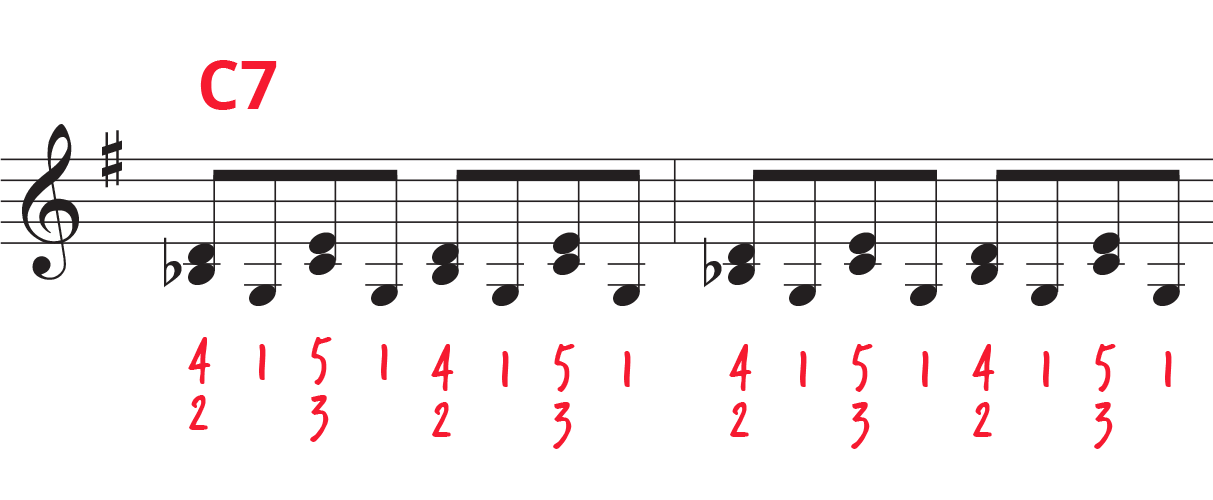
Inject a little swing by stalling on those first two notes!
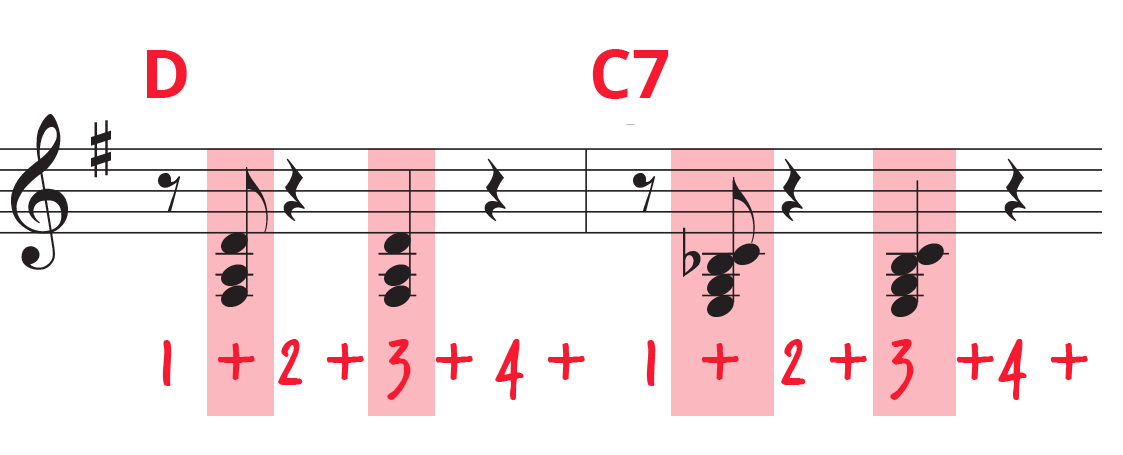
Instead of repeating this pattern all the way to the end, Kevin plays the last few chords solid and syncopated. Broken down, the counting looks like this. But if counting makes things too complicated, just get a feel for the music and use your intuition.
Wanna sound extra groovy? Slip a B-Flat slide into your right hand G chords.
Now is the time you’ve all been waiting for—putting our hands together!
This is important: start slow. There are three back track tempos available in the Members’ area—slow, medium, and fast. Move at your own pace. You can use the left hand walking bass as an anchor to keep your rhythm steady.
Love our video tutorial? Subscribe to our newsletter for piano news, exclusive interviews, new tutorials, interesting articles, and more delivered to your inbox every week. Unsubscribe at any time.
The ending Kevin has come up with is super fun and impressive. It’s essentially a scale doubled up in both hands from G to G with an added C#. Then, land on the G7 chord with your pedal and tremolo—this means rocking back and forth rapidly between G and B-D-F.
Finally, top things off with a glissando, trailing your hand from one end of the keyboard to the other!
A fun way to hone your skills and practice with a metronome without the boring tick-tick-tick is to practice with a backing track. We have three backing tracks available for Members at 80bpm, 130bpm, and 180bpm.
If you’re not a Member but want to try the backing track, here’s a 7-day free trial of Pianote, just for you! Happy practicing!
Lisa Witt has been teaching piano for more than 20 years and in that time has helped hundreds of students learn to play the songs they love. Lisa received classical piano training through the Royal Conservatory of Music, but she has since embraced popular music and playing by ear in order to accompany herself and others. Learn more about Lisa.
/marketing/pianote/lead-gen/digital-chords-and-scales/master-every-chord-bg.png)
Enter your email address to get your FREE E-Book instantly.
By signing up you'll also receive our ongoing free lessons and special offers. Don't worry, we value your privacy and you can unsubscribe at any time.
/marketing/pianote/lead-gen/chords-progressions-digital-book/chord-progressions-exit.webp)
Want to play the most popular songs on piano?
Grab the Little Book of Chord Progressions to learn the most popular chord progressions used in modern music.
No credit card. No spam.
Just awesome chords to get you playing.
Don’t worry, we value your privacy and you can unsubscribe at any time.
/marketing/pianote/promos/april/trial-banner.png)