Solo-ing on the piano can be scary and intimidating! But with the right tools, anyone can learn slick moves. This lesson will give you easy piano improvisation exercises to get started with.
The first step in solo-ing confidently is to assemble your ingredients. And what’s the most important ingredient? Your scale!
You want to know, with confidence, which notes sound good together. To do this, we need to know our scales. Knowing your scales will make the solo-ing process so much easier by specifying exactly what ingredients you need to sound good!
So, how do we figure out which notes sound good together? Well, first we have to find our key signature, which will help us find our scale.
To find the key signature, look at the amount of sharps and flats in the piece you’re solo-ing on. Then, take out your handy Circle of Fifths and see which key signature matches with your number of sharps and flats.

For example, if you have no sharps or flats, C Major or A Minor may be your key. (To test whether a song is C Major or A Minor, you can play or listen to it and see if it sounds “sad” or “happy.”)
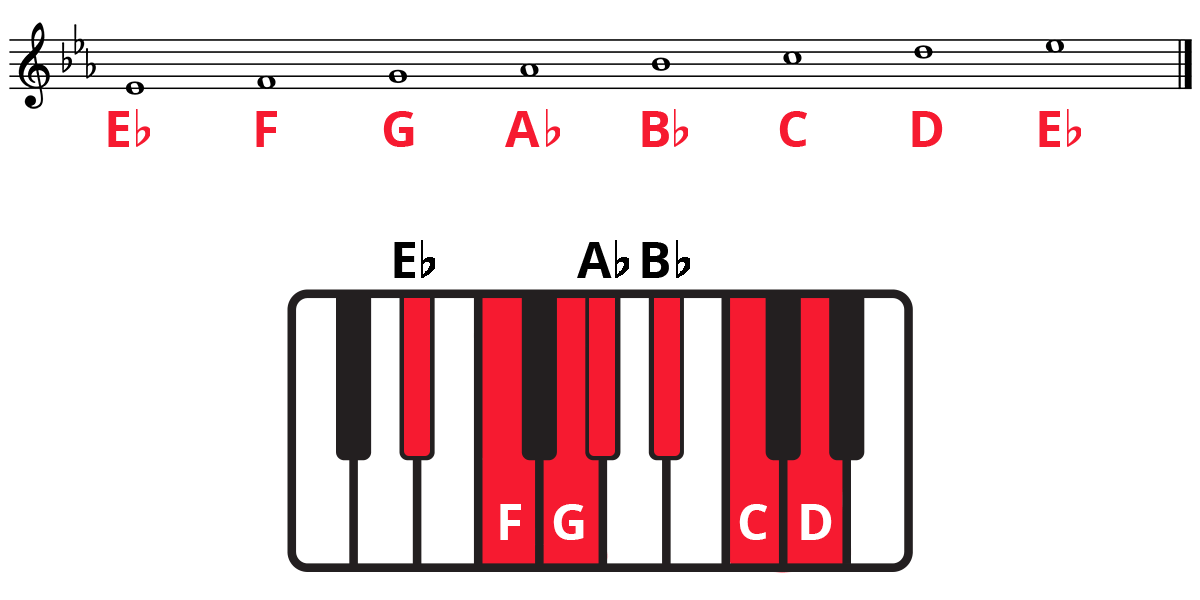
In our video, we’ll be using E Flat Major. E Flat Major has three flats. So, from Eb to Eb, it looks like this:
Next, play the scale (in our case, E Flat Major) on your right hand over your chord progression in your left hand.
You’ll discover that the scale and the chord progression sound “right” together!
To make things more interesting, try varying the order of notes played on your right hand.
Now, let’s turn that scale into a solo!
First, Sam teaches me to play a simple pattern on my right hand while he plays the left-hand accompaniment. The pattern I use in the video is a simple Eb major triad (Eb-G-Bb).
Then, once I was comfortable with this basic pattern, I varied the notes a little bit. I didn’t stray too far off from the original pattern; all I did was repeat some notes here and there.
Be careful not to forget about your notes, though! Sometimes, we can get so embedded into the pattern that we forget the ingredients (the scale). So, know your scales! Some extra scale practice helps 🙂
These are all little baby steps, but the scale is already sounding less like a scale and more like a solo!
I noticed that as I got comfortable branching out beyond my basic pattern, I became more inspired by rhythm. Turns out: that’s step three of this piano improvisation exercise!
So, pick a rhythm and use it to play some of your ingredient notes.
If you’re not ready to play yet, another way to get comfortable is to clap along to the rhythm while the accompaniment plays.
Sam also uses scatting to keep himself on top of things!
Next, try “highlighting” parts of the rhythm you’re using with your left hand accompaniment. You might discover that your hands will start “talking” to each other, influencing what each other is playing.
Pretty neat, huh?
As you can see, if you approach it with the right steps, improvising doesn’t need to be scary. Just make sure you know your ingredients well.
Scales | Patterns | Rhythm
If you want to go even further in your improvisation journey, check out the improvisation section of our blog. Or, check out these lessons:
Happy practicing!

Lisa Witt has been teaching piano for more than 20 years and in that time has helped hundreds of students learn to play the songs they love. Lisa received classical piano training through the Royal Conservatory of Music, but she has since embraced popular music and playing by ear in order to accompany herself and others. Learn more about Lisa.
/marketing/pianote/lead-gen/getting-started/coach.webp)
By signing up you’ll also receive our ongoing free lessons and special offers. Don’t worry, we value your privacy and you can unsubscribe at any time.
/marketing/pianote/lead-gen/chords-progressions-digital-book/chord-progressions-exit.webp)
Want to play the most popular songs on piano?
Grab the Little Book of Chord Progressions to learn the most popular chord progressions used in modern music.
No credit card. No spam.
Just awesome chords to get you playing.
Don’t worry, we value your privacy and you can unsubscribe at any time.
/marketing/pianote/promos/april/trial-banner.png)