I cannot stress this enough.
You need to be practicing your chord inversions. When I was younger learning the piano, I went out of my way to avoid practicing them.
But now, they are probably the thing that I use the most in my playing. I love playing and singing popular songs, and I use chord inversions all the time.
Knowing chord inversions is one thing, and we have a lesson on them here. Knowing how to practice chord inversions to get more comfortable is another. And that’s what you’ll learn today, so you can play them confidently, quickly, and without any fear or stress.
Because once you can do that, you can basically play ANY song from a chord chart with ease.
We’ll start with my #1 tip:
DON’T practice inversions in C Major
Beginners love C major. I love C major. It’s a great key and easy to learn (only white notes!).
But when you’re learning how to practice chord inversions, C major can make life harder than it needs to be. That’s because it only uses white notes, and white notes can look VERY similar when you’re jumping around the keyboard.
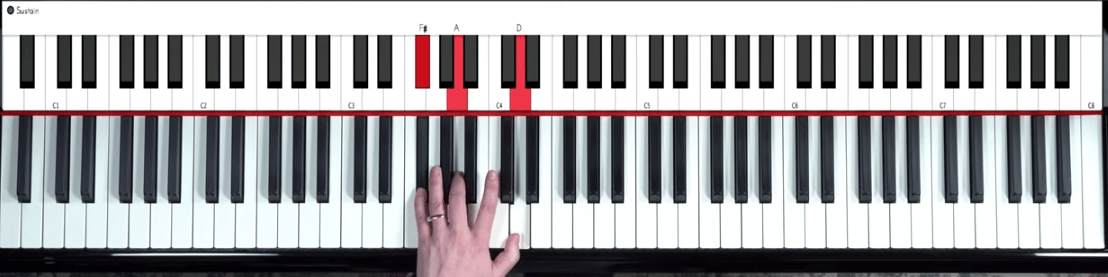
So I strongly suggest you pick a key signature that has at least 1 black note. Today we’ll be using D major. It has F#, and we’ll be using that black note as a landmark note. It will be our anchor that we can always find quickly.
To start, let’s run through how to play each inversion in the key of D.
This is the most common chord and it’s our starting point. The notes are the 3 notes of the D major triad. They are D-F#-A. You’ll play them with your 1-3-5 fingers. That means your thumb on D, your middle finger on F#, and your pinky on A.
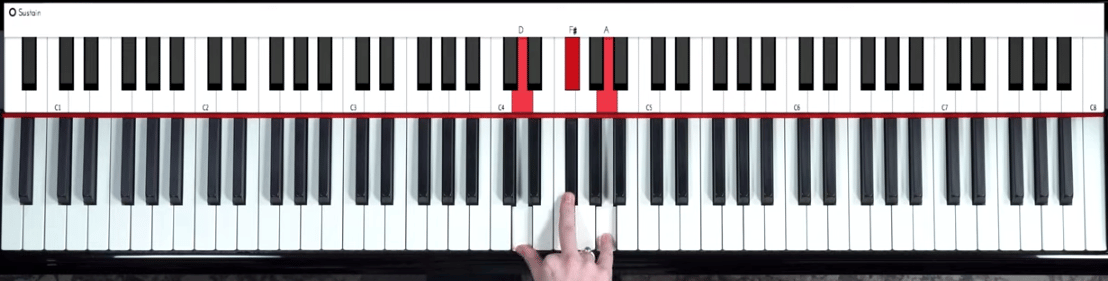
Get comfortable with this chord and with the chord shape. One thing people often worry about with inversions is what notes to play. Well, the best thing about practicing chord inversions is that the notes will never change. They will always be D-F#-A. All you’ll be doing is playing them in a different order.
Once you’re comfortable in root position, it’s time to switch to 1st inversion. To make a 1st inversion chord you simply take the bottom note and move it to the top. Now the D is at the top of the chord, in the 1st position. That’s why we call it 1st inversion.
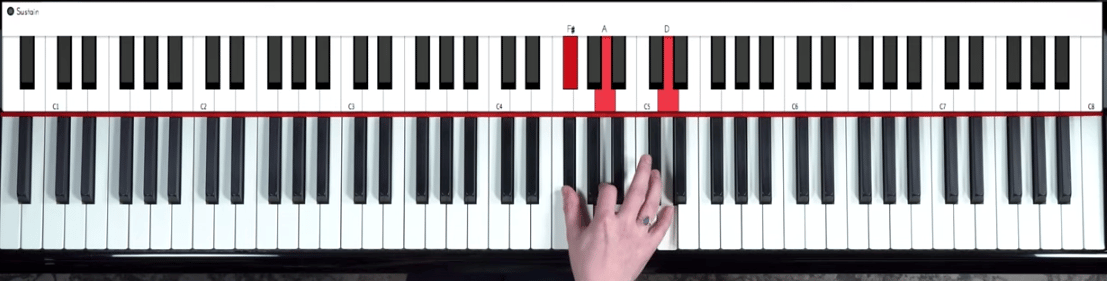
I want you to notice 3 things about this chord. First, the notes are still D-F#-A. They do not change. They’re just in a different order (F#-A-D).
Second, the spaces between the notes. There is a bigger space between the top 2 notes of this chord than the bottom 2. This is another way you can identity 1st inversion chords. The bigger space is always between the top 2 notes.
And finally, look at the fingering. This is critical. Instead of using 1-3-5 fingering (like in the root position), I’m now using 1-2-5 fingering.
The reason is simple; the notes fit so much better under my hands with this fingering. There is no stretching or straining.
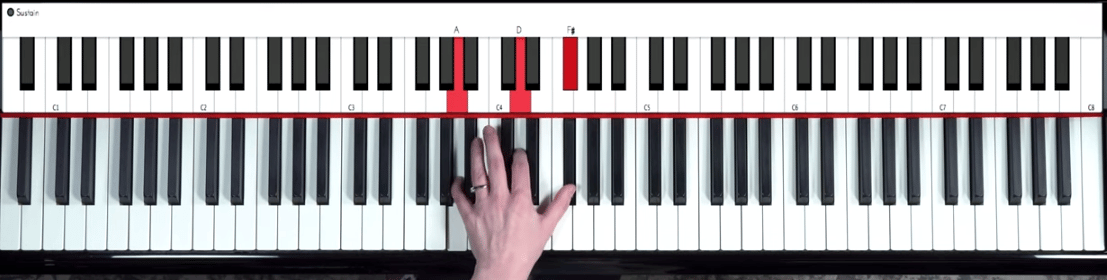
This will be the last chord shape you have to learn today. And to make it, you follow the pattern from before. Move the bottom note of the 1st inversion chord to the top, and now you have a 2nd inversion chord.
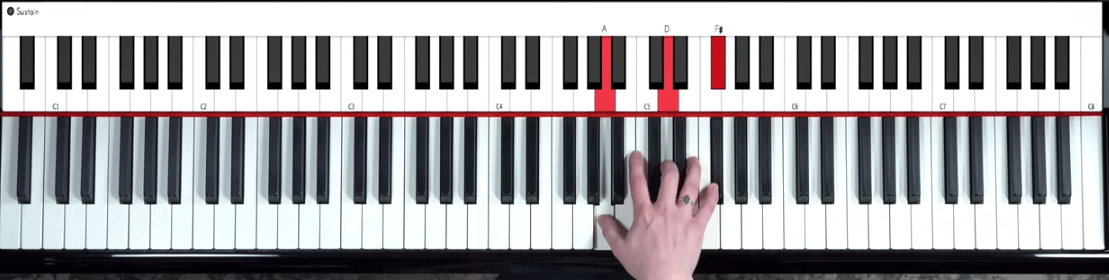
It’s called a 2nd inversion because the root note (D) is now the 2nd note in the chord. But the notes are still the same 3 as always, just in a different order again (A-D-F#).
Notice the change in spaces. Now the small space is at the top and the big space is at the bottom.
And the fingering is back to the 1-3-5.
Now you know how to play the chords in their inversions, it’s time to learn how to practice chord inversions so you can get better and start using them!
And it’s all about … repetition.
That means breaking down these changes into smaller steps and focusing on one chord change at a time.
I know it’s not sexy or a quick fix, but it is the best way to see results. Too many people try to rush ahead only to get frustrated and give up.
So let’s look at those smaller steps. Start by practicing the change from root position to 1st inversion, like this:
Do that back and forth, over and over until it feels comfortable and clean. It probably won’t happen in the first practice session. That’s ok.
Once you’ve got that down, move on to the next one. Practice swapping from the 1st inversion to the 2nd inversion, like this:
And when you can do that move from 2nd inversion to root position.
Wash, rinse, repeat. Always repeat.
Everything you’ve learned about practicing chord inversions for your right hand can (and should) be applied to your left hand as well.
There is only ONE key difference. And that’s the fingering for some of the chords. I’ll show you quickly.
Here’s the root position:
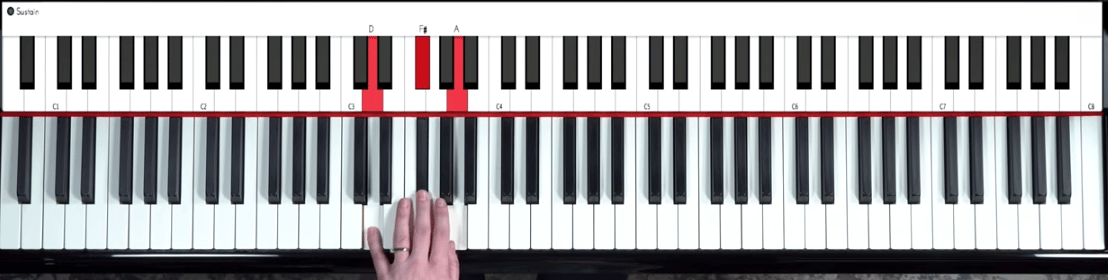
The fingering is 5-3-1 (same as the right hand).
Things get a little different for the next two chords. Here’s the 1st inversion:
For this, I keep the fingering of 5-3-1. That’s because it fits comfortably under my hand.
The fingering changes when we move to a 2nd inversion:
Here I use 5-2-1. Again this is because it’s the best fit under my hand.
It’s good to remember that piano fingering is designed to be the most comfortable and economical way to play the piano. If your fingering feels strained, make sure you’re using the correct fingering for the chords.
Just like you practice the individual changes with your right-hand, do the same thing with both hands. Break it down into small steps and practice each individual chord change until it feels comfortable.
You might have to slow it down when you start practicing hands together. But that’s totally normal. Focus on playing it correctly and then worry about your speed.
Inversions will change how you see and play songs on the piano. Know you know how to practice chord inversions, it’s up to you to put in the work so you can get the use and joy from them.
Subscribe to The Note for exclusive interviews, fascinating articles, and inspiring lessons delivered straight to your inbox. Unsubscribe at any time.
Lisa Witt has been teaching piano for more than 20 years and in that time has helped hundreds of students learn to play the songs they love. Lisa received classical piano training through the Royal Conservatory of Music, but she has since embraced popular music and playing by ear in order to accompany herself and others. Learn more about Lisa.
/marketing/pianote/lead-gen/getting-started/coach.webp)
By signing up you’ll also receive our ongoing free lessons and special offers. Don’t worry, we value your privacy and you can unsubscribe at any time.
/marketing/pianote/lead-gen/chords-progressions-digital-book/chord-progressions-exit.webp)
Want to play the most popular songs on piano?
Grab the Little Book of Chord Progressions to learn the most popular chord progressions used in modern music.
No credit card. No spam.
Just awesome chords to get you playing.
Don’t worry, we value your privacy and you can unsubscribe at any time.
/marketing/pianote/promos/april/trial-banner.png)