“My left hand has a mind of its own.”
You know the feeling … you tell your left hand what to do, but it just won’t listen.
This is especially true when it comes to building speed. Your right hand is ALWAYS faster than your left, and it’s easier to build speed with your right than your left.
This is common!
Most people are right-handed, so it’s natural that your dominant hand will develop faster and feel more comfortable. But here’s the good news:
You can fix it!
Here are 3 exercises that will help build your left-hand speed. And that will help you build strength, dexterity, and CONFIDENCE. Plus you’ll be able to play faster.
And that’s always fun 🙂
This is a shorter version of an exercise from our Faster Fingers training course. It focuses on your fine motor skills and finger independence. It can be a little frustrating, so take it slow.
Here’s the transcription:
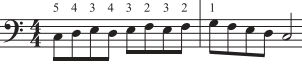
You can see that you’re just stepping up 2 notes and back down one. Always only using the five-finger scale. After playing this on C, move everything up one step to start on D, but still use the notes fo the C scale (no sharps or flats).
Moving from your 5 to 4 finger can be really challenging. If you watch the lesson you’ll see my pinky still wants to jump up.
Once you’re comfortable in C then you can try it in other key signatures. But remember to start slow. Going too fast too soon can lead to frustration. And we’re trying to avoid that!
For many people, our left hands are weaker. And while the right hand typically carries the melody on the piano, piano wouldn’t be the same without the left hand providing beautiful arpeggios and accompaniment patterns. Your left hand deserves more love, so check out the De-stupefy Your Left Hand course to give it the attention it needs! Free with your Pianote membership.
I love this exercise because it involves jumping around the keyboard a bit, which mimics what you do when you play real songs!
You’ll be playing octaves, but you’ll play them broken, not together. So if you have smaller hands (like me) it’s not a problem! Just play the bottom note and then to top note of the octave. Use your wrist to help you rotate to reach that top note if you have to.
But you won’t just play the root note. You’ll move through the notes of a chord. Take a C major chord for example. The notes of a C chord are C-E-G.
So play broken octaves back and forth on the C, and then JUMP to the E and play broken octaves there, before jumping up to the G and doing the same thing. Then come back down to the C.
To make this more challenging, choose different chords. Chords with black keys present a very nice challenge!
This is a CLASSIC left-hand pattern that comes from classical music. It’s called the “Alberti Bass”, named after Domenico Alberti. It can sound like a very intimidating patter, but it’s very simple.
You take the notes of a chord and play them in a broken pattern of “bottom – top – middle – top – bottom – top – middle – top” and so on. That can sound confusing so here it is written out in sheet music:
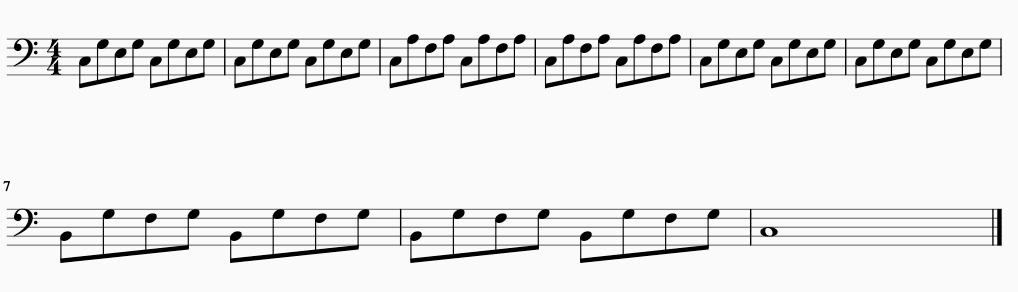
There’s a lot going on here, so let’s break it down by measure. The first 2 measures are C major chords in root position. The notes are C-E-G.
But the pattern is the one I outlined above. See how it’s bottom (C) – top (G) – middle (E) – top (G). That just repeats for 2 measures.
Then for the next 2 measure, we have an F chord in 2nd inversion. If you’re not sure about inversions check out this lesson. But even though we are in an inversion we still use the same pattern of bottom (C) – top (A) – middle (F) – top (A) and that also repeats for 2 measure.
Then we’re back to the C chord and do exactly the same thing we did in the first 2 measures.
Measures 7 and 8 are a little different because we have a G7 chord in an inversion.
Let’s break that down a little bit.
A G7 chord has the notes G-B-D-F. You can see in measure 7 we have the notes B-G-F. So we’re missing the D, but that’s ok. It’s the F note that makes this a G7 chord and gives it that feeling of tension. Read this lesson for more on 7th chords (and why they’re so great!).
But still, the pattern stays the same. Bottom (B) – top (G) – middle (F) – top (G) and we repeat that for 2 measures before resolving and ending on the C.
As I mentioned at the start of this lesson, when you watch me you might notice that even after years of practice my pinky STILL wants to lift up. I told my hand has a mind of its own.
So don’t feel discouraged it these are a little tricky. Change and improvement take time. But a few minutes a day and you will notice a difference.
Good luck, and have fun!
Lisa Witt has been teaching piano for more than 20 years and in that time has helped hundreds of students learn to play the songs they love. Lisa received classical piano training through the Royal Conservatory of Music, but she has since embraced popular music and playing by ear in order to accompany herself and others. Learn more about Lisa.
/marketing/pianote/lead-gen/getting-started/coach.webp)
By signing up you’ll also receive our ongoing free lessons and special offers. Don’t worry, we value your privacy and you can unsubscribe at any time.
/marketing/pianote/lead-gen/chords-progressions-digital-book/chord-progressions-exit.webp)
Want to play the most popular songs on piano?
Grab the Little Book of Chord Progressions to learn the most popular chord progressions used in modern music.
No credit card. No spam.
Just awesome chords to get you playing.
Don’t worry, we value your privacy and you can unsubscribe at any time.
/marketing/pianote/promos/april/trial-banner.png)